



Mid Calder Station
Mid Calder Station
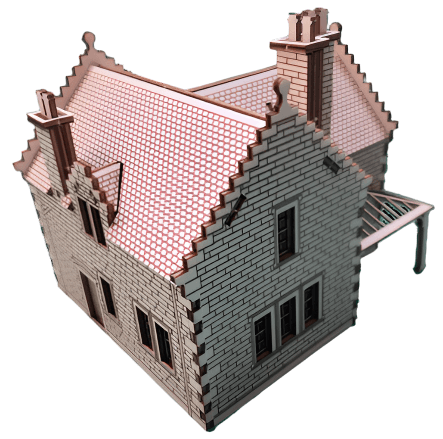
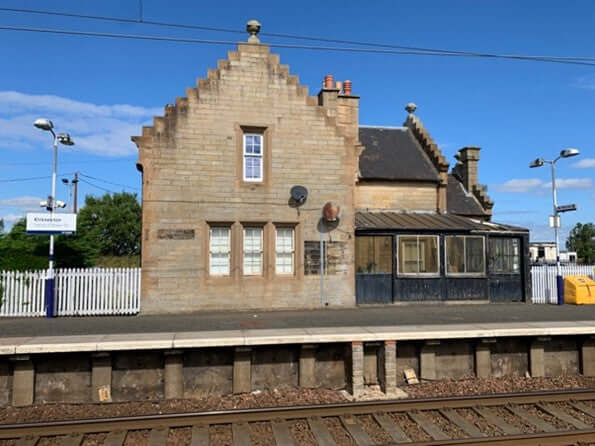
Mid Calder Station (now called Kirknewton) is very much to the Caledonian Railway “Locke and Errington” style. The basic concept is of a villa main building with offices on the ground floor and accommodation for the station master on the first. As always with railway buildings the standard was more loose guidance but the core design, embellished with additional gabled extensions, and a variety of canopies could be found across the Caledonian Railway Network. Examples are found: as far South as Shap and Gretna; there is a collection of minor stations between Stirling and Perth; and a number across the central belt of Scotland of which Mid Calder is a fine example. Mid Calder lies on the Glasgow Edinburgh line via Shotts and was opened in 1848 (renamed in 1982).
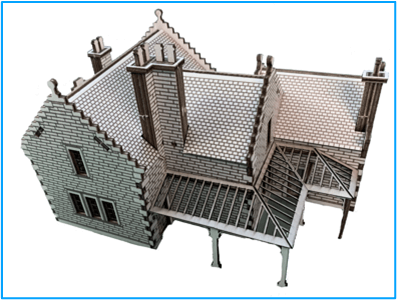
The kit is in 2 parts to allow the modeller the option to customise the model to meet the variety of the Locke and Errington stations. The “Stage A” part is for the basic building with 3 gables (similar to Ecclefechan and Forteviot) albeit to the Mid Calder design. The addition of Stage B (a separate kit that cannot be used on its own) allows the addition of gabled extension and larger canopy and, as a further option, the extension on Mid Calder with the external staircase.[1] This seems to follow the actual progression of the building as these extensions were added in the 1890s and 1902. With thanks to the Caledonian Railway Association and, in particular, John Paton for their help in the research for this kit.
Mid Calder Station is available in 2 versions :
- “Stage A”: A standard Locke and Errington Station based on Mid Calder station.
- “Stage A & B”: Extended version. The additional “extensions” to complete the Mid Calder station.
Stage B can ONLY be used in conjunction with stage A (see drawings).
Choose which option you would prefer, stage A or Stage B (stage B will be sent to you with stage A included)
The current Kirknewton station has a small additional extension at the top – but that is NOT available with the Stage B kit.
The basic OO kit base is 145 x 125mm in size when made, with extensions option B 1 201 x 145, or B2 201 x 148mm.
The building requires glue. Choose a glue that allows at least a minute before setting to allow adjustments to be made during the build. Always test the build before using glue.
For finishing, we recommend first priming the surface, then painting with any acrylic or model paint of your choice. The material is etched, so any engraved detail such as brickwork or roof tiles will be visible after painting.
All TT:120 gauge kits are scaled to 66% of the size of the original OO gauge model. The mathematically correct conversion from OO to TT:120 is approximately 63.33%, meaning that our TT:120 models are intentionally slightly oversized.
Scaling to N gauge works well and requires no additional modifications due to the material thickness. Some parts will be very fine, so take care when removing them from the frame. If some window pieces are particularly fine, they can be reinforced by soaking them in glue before assembly.
When scaling to O gauge, some manual modifications may be required during assembly. This is due to the increased material thickness required when scaling from the 3 mm plywood used for OO gauge. At true O gauge scale, the equivalent material thickness would be approximately 5.25 mm. As this thickness of plywood is not readily available, we use the closest available thickness, 4 mm plywood.
Couldn't load pickup availability


'%3E%3Cpath fill='%235A31F4' d='M53.413.209H4.321A4.063 4.063 0 00.258 4.272v28.523a4.063 4.063 0 004.063 4.063h49.092a4.063 4.063 0 004.063-4.063V4.272A4.063 4.063 0 0053.413.209z'/%3E%3Cpath fill='%23fff' d='M32.678 14.872c0 2.663-1.867 4.564-4.476 4.564h-2.458a.206.206 0 00-.206.207v3.5a.207.207 0 01-.206.207h-1.72a.208.208 0 01-.191-.128.205.205 0 01-.016-.078v-12.63a.206.206 0 01.206-.207h4.602c2.598-.003 4.465 1.898 4.465 4.565zm-2.145 0c0-1.531-1.044-2.65-2.46-2.65h-2.329a.206.206 0 00-.206.207v4.874a.206.206 0 00.206.206h2.329c1.416.01 2.46-1.11 2.46-2.637zM33.188 20.927a2.453 2.453 0 011.026-2.104c.671-.505 1.72-.766 3.26-.82l1.64-.058v-.484c0-.97-.65-1.38-1.694-1.38s-1.706.37-1.858.975a.2.2 0 01-.198.144h-1.62a.203.203 0 01-.206-.235c.24-1.434 1.433-2.524 3.956-2.524 2.684 0 3.653 1.25 3.653 3.636v5.066a.209.209 0 01-.21.207h-1.633a.209.209 0 01-.146-.06.206.206 0 01-.06-.146v-.379a.155.155 0 00-.268-.109c-.49.533-1.281.918-2.548.918-1.864 0-3.094-.97-3.094-2.647zm5.926-1.098v-.393l-2.124.112c-1.119.057-1.77.522-1.77 1.305 0 .708.597 1.1 1.64 1.1 1.417 0 2.254-.765 2.254-2.124zM42.787 27.178V25.71a.21.21 0 01.25-.204c.25.047.505.071.76.072a1.961 1.961 0 001.975-1.4l.106-.338a.218.218 0 000-.14l-3.403-8.74a.21.21 0 01.194-.286h1.65a.21.21 0 01.194.135l2.311 6.164a.21.21 0 00.396 0l2.007-6.147a.21.21 0 01.2-.144h1.707a.212.212 0 01.197.287l-3.64 9.706c-.838 2.256-2.275 2.833-3.857 2.833-.3.008-.6-.028-.89-.107a.212.212 0 01-.157-.223zM12.352 9.579a8.475 8.475 0 00-5.844 2.28.37.37 0 00-.046.495l.981 1.34a.375.375 0 00.573.045 6.063 6.063 0 014.344-1.775c3.364 0 5.121 2.532 5.121 5.032 0 2.718-1.846 4.63-4.499 4.668-2.05 0-3.595-1.359-3.595-3.154a3.065 3.065 0 011.133-2.365.37.37 0 00.051-.516L9.54 14.327a.376.376 0 00-.536-.055 5.448 5.448 0 00-2.03 4.238c0 3.09 2.626 5.514 5.99 5.534h.045c3.994-.052 6.882-3.01 6.882-7.053 0-3.59-2.644-7.412-7.538-7.412z'/%3E%3C/g%3E%3Cdefs%3E%3CclipPath id='clip0'%3E%3Cpath fill='%23fff' d='M0 0h57.699v37H0z'/%3E%3C/clipPath%3E%3C/defs%3E%3C/svg%3E)